Simple, 2 light, Editorial Portrait Setup
Posted By Mike Capson | December 23, 2014 | Posted in - Behind the Scenes

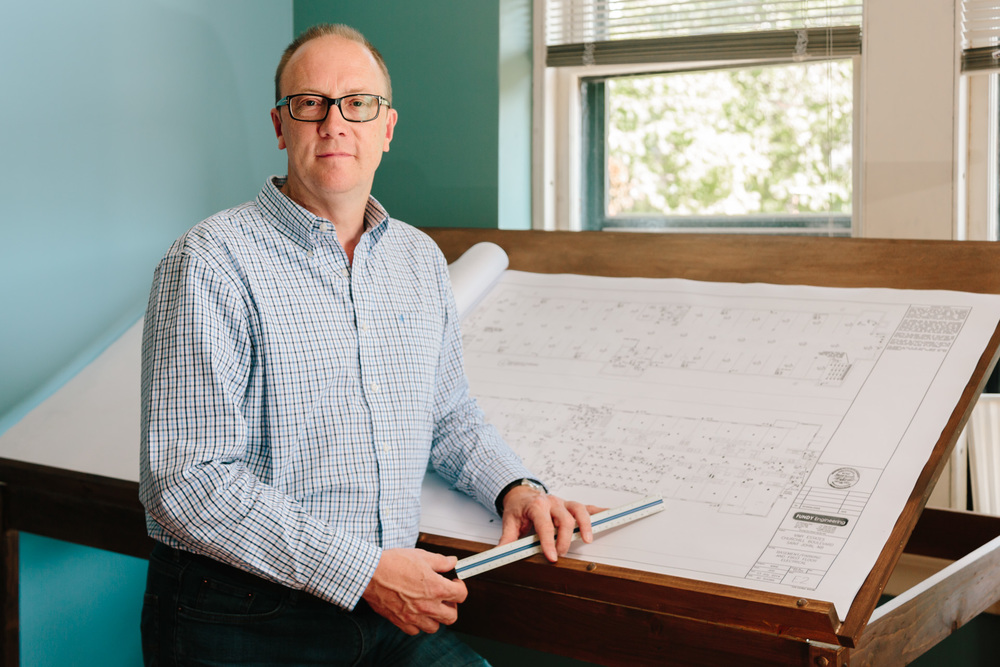
A few weeks ago I was sent to shoot some commercial portraits for an engineering firm here in Saint John. Often I am given very little detail into the actual shoot I will be doing. I usually just get the rough idea for the shoot and the subject I will be shooting. 99% of the time I do not know the exact conditions I will be shooting in. For this shoot I was told the client wanted an environmental portrait showcasing the business, the subject, and some personality.
When I arrived the first thing I noticed was that space was limited. I decide on using the CEO’s office space as the backdrop for the photo. There was a very well made drafting desk in the corner near the window. I elected to use this as the backdrop for the image and also include it to show that the subject was in this field of work.
Because I had included an outside window in the shot I had to manage my exposure to ensure I was clipping any highlights. I really enjoyed the green leaves of the trees that could be seen from the outside so I wanted to capture those colors alongside the image. To do this my base exposure was quite dark. I landed upon ISO 400, f4, 1/50th for a base exposure. This left the room dark but the window with detail. I then needed to boost the ambient exposure by using some speed-lights.

As you can see above I just needed two speed-lights for this portrait. The first speed light was positioned to the left, just outside of the frame. The light was pointed up into the ceiling. The light stand was raised high about 7 feet. Luckily the ceiling was white and I was able to bounce this light to create a very large ambient light which brought the room level up a few stops. This light was set at 1/32 power. It was also bare with no diffusion on it.
The second light I added to this frame was camera right. This was my main light for lighting the subject. It was set at 1/16th power and I used a shoot through umbrella to soften the light. I was considering lower the power on this speed-light and then filling in the shadows further however I was without my assistant this day and therefore was left short handed.
The reason I choose to shoot through the umbrella and not bounced into the umbrella was due to the amount of light I needed. Because I was without an assistant I was traveling light. Therefore I used the key light to also light some of the drafts that were on the drafting table. Shooting through the umbrella allowed more light to spill onto the table. I usually never shoot through umbrellas for this reason however this was one occasion which proved to work quite well.
The one issue I had a bit of trouble figuring out was the light reflections from my speed-light into the subjects glasses. This was quite simple to remedy by moving the angle of the light slightly. Always remember that light bounces much like a pool ball. If you imagine it this way its quite easier to figure out where to place the light and where to place the camera. There is an excellent article about this on Strobist if you want some further reading.
Advertisement